How to register on ~vern
So you want to register an account over at ~vern. Different people have different reasons to joining, maybe they want to regain their privacy, abandon proprietary software or just for fun. However, it does not matter why you want to join as much as what you do with your membership.
This guides covers 2 things, how to generate an SSH key and how to register an account. It also explains each of the ~vern services in the register page briefly so that you can make a choice.
Before registering, you must generate an SSH key. An SSH key is used to identify a user, it can be used to login to ~vern’s public UNIX servers or to push to ~vern’s Git repositories. If you do not want to use the public UNIX server or do not want to generate an SSH key then contact an administrator to see how they can help you out.
How to generate an SSH key
SSH keys are keys used to login to the ~vern public Unix server, it’s necessary for an account using the normal registration method but you can contact an administrator to create an account without Pubnix access. Just be warned that you cannot host your own website on ~vern if you do that.
There are currently guides for GNU/Linux, MacOS, Windows and BSD.
GNU/Linux
Generating an SSH key on GNU/Linux is easy, as OpenSSH (the tool we will be using) is installed in most Linux distros by default (it is very useful after all)
To test if you have OpenSSH, you can run the
following command: ssh -v
If the command returns any form of output then it does exist but if it says nothing then it doesn’t exist.
You can install openssh in most Linux
distributions using your package manager, for
Debian/Ubuntu you can use this command:
sudo apt install openssh-client
Start by opening a terminal and running this
command ssh-keygen -t ed25519
This will generate an ED25519 key, ED25519 is a relatively new encryption algorithm that is just as secure as the traditional RSA/DSA algorithm. But it is way more lightweight which means it’s easy to use and storage.
Now it will ask you for a couple of options including where to save it and whether to use a password. You can use a password but if you have an encrypted system or you store your machine in a safe and secure place then it most likely is not needed. But it’s useful as extra insurance just in case your key gets lost.
Now you should have an SSH key! an SSH key is
typically divided into 2 parts: the public key
and the private key. You can send the public key
to anyone you want without any risks but the
private key has to be kept
secure. You cannot share with anyone else and
you must be careful. The public key ends with
.pub and the private key has no
extension.
~vern uses your public key to verify its you and to send encrypted data to you, your private key can be used to decrypt this data. This means anyone with your private key is able to listen to your communication and impersonate you, this is why its dangerous to share your private key with anyone or to use anyone else’s public key.
MacOS
The procedure should be similar to the one in GNU/Linux. SSH is pre-installed on most modern MacOS versions. If it isn’t, you can get it via homebrew.
BSD
The procedure should be similar to the one in
GNU/Linux. OpenBSD and FreeBSD include OpenSSH
by default. NetBSD users can get
security/openssh from pkgsrc.
Windows
This guide only applies to Windows 10 or later.
There seems to be no instructions online on how to generate SSH keys for Windows 8 or earlier. Though you can contact the wiki maintainers if you do find any so we can add it here.
This is a step by step guide on how to generate an SSH key, you will need this to login into ~vern, setup your website and push changes to Forgejo.
Open up a command line terminal by pressing the Super key (The one with a Windows logo) and R at the same time and then typing cmd.exe and press Enter.
You should now be presented with a command-line terminal.
Type ssh-keygen -t ed25519 to
generate an ed25519 SSH key. An ED25519 key is
super light and super easy to store, ed25519 is
a new encryption cipher compared to the
traditional RSA/DSA keys, RSA/DSA keys are
compatible with all SSH servers and clients but
they are large and they take up too much
storage. For modernization purposes, use ed25519
instead of rsa. It is not less risky than RSA
and it is easier to use.
Now it will ask you where to save it, you can save it wherever you want but make sure to remember where it is.
And now you can enter a passphrase for extra security, this is not needed if your OS is encrypted or if you store your computer in a safe place but the option is available for anyone who needs it. Just make sure to remember your passphrase because SSH will ask you for it when you connect, you can put it into a password manager too!
Now you have an SSH key! This is what you will be using to connect to ~vern’s public Unix server so keep it safe. Your SSH key is divided into 2 parts, the Public key which you can share with anyone you want and the private key which you HAVE to keep safe.
The public key is what ~vern uses to verify its you, and you can send it to anyone you want but the private key is the part that does the decryption, do not share with anyone and be careful with it. The public key ends with .pub and the private key does not have an extension.
It’s absolutely important that you do not ever leak your private key otherwise anyone will be able to impersonate you and listen in to your communication with ~vern.
Windows 8 or below
If you are using Windows 8 or below, ssh is not available directly on the system, so you have to use another ssh implementation, there are multiple options for this, the most common one is Putty which is a Windows implementation of ssh client, sftp and ssh key management.
The software is available for download from Putty, you need at least putty.exe and puttygen.exe, also using pageant.exe is useful, so you might as well download the whole zip file.
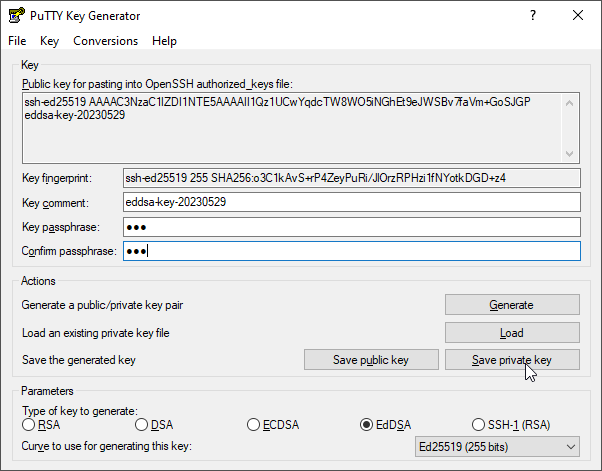
To create a ssh key, you can run puttygen.exe and click on generate, this will create a public/private key pair and you can choose which key algorithm you want, currently eddsa (ed25519) is recommended, but a rsa-4096 key will work as well. The eddsa key is much shorter and that is probably more convenient, also some servers might not support RSA for more security (some git servers seem to do that). For vern.cc both will work.
The tool will take some time, you can speed that up by moving the mouse, when the key is finished it will show the public key and the key parameters and you can set a passphrase to protect the key that you will enter each time you use the key or when you load the key into the key agent and enter the passphrase once. This passphrase should be reasonably long so that it cannot be guessed, anybody who knows your passphrase and has the private key file can log into your accounts using the key.
After creating the key, the dialogue will look like this.
After you have created the key, be sure to save both the private keyfile and the public keyfile, the private key file will be e.g. ed.ppk, the public key file will be called ed.pub. The public key file is a single line text file that you need to send to the vern admins to request your account. You can also use the key displayed in the text field with copy-and-paste, that is the same text string.
If you need the private key file in a format compatible to openssh (e.g. if you want to be able to do ssh from the vert.cc shell account to the git server), you need to open the .ppk file with puttygen.exe and export the key as openssh key file. By convention this file is usually called id_format without an extension, e.g. it might be called id_ed25519 but it can be any filename. If you use this private keyfile, you can use any openssh ssh client, e.g. if you use Cmder, Mobaxterm or any Cygwin, though in this case you could use the tools to create the keys to begin with and get the right format.
If you use putty, you can add the key file to the session that you use for vern as described in the ssh article which will ask you for the passphrase each time you log in or you can use the pageant program to cache the key and use it without providing the passphrase. This is automatically picked up by putty and when you select agent forwarding, you can also use the private key on the shell session including using git with ssh without copying the file, however this has a security concern if you do not trust the shell host you log in since that might “borrow” your agent session if the admin is malicious (obviously we will trust the vern admins with that). If you use a putty session, you can turn agent forwarding on and off or if you use another ssh client, you can use -A to allow agent forwarding or leave it out if you do not need it.
If you use the pageant program, other programs will be able to pick up the ssh key as well, e.g. some versions of git for windows, mobaxterm or the Winscp tool, so this is a rather useful tool to run.
If you put it into your startup folder, you can add the name of the ppk file as a parameter, this way the program will ask you for your keyphrase when starting, otherwise you need to add the key with “Add key” or drag the file into the pageant window.
How to register an account at ~vern
Now that you have an SSH key, we will finally register an account.
Go to the ~vern register web page over at https://vern.cc/register
And then type your desired username, the username cannot be changed so choose carefully. Pick something elegant and remember to keep it simple, long usernames are painful to type everyday. So keep it around 3 to 6 characters, anything less than that is confusing and anything more than that is hard to type a lot.
In the next field, you will need to type an email, the email is used to contact you when your account has been successfully processed and is also used to contact you by the ~vern admins when necessary. We will not send spam or share this email with any third parties and it is only used to register services for your ~vern account.
Now you need to add your SSH public key,
Please remember the difference between public
keys and private keys, DO NOT SHARE YOUR PRIVATE
KEY WITH ANYONE ELSE OTHER THAN YOU, we need
your public key, it is the key that ends with
.pub please do not mess this
up.
And of course, do NOT send GPG keys or other stuff here, this is used for your login and if you do not send an SSH key then you will not be able to login.
In the next field, type why you wanted to join, and please be honest. We rarely decline people’s requests and so there is no wrong answer.
Now you can select what services you want, anything you select here will be registered for you by the admins but you can always request an account later by contacting an admin. To help you out, I will briefly explain what each service is:
- Pubnix: this is what your SSH key is used
for, it is a UNIX terminal on one of ~vern’s
servers, here you can type commands, have fun
and do whatever you want. You can also upload
your website to a folder called
public_htmlhere and it will be available over atYOUR_USERNAME.vern.cc - Matrix: Matrix is a chat system that is end-to-end encrypted meaning not even the admins can see you messages. It is also decentralized which means there isn’t a single person controlling everything (like Google or Facebook) and it is open-source which means the source code is publicly available and can be seen by everyone. Matrix is an ethical alternative to WhatsApp, Discord or any other instant messaging service.
- Fediverse (Mastodon): The Fediverse is an interconnected system of servers that can all send messages to each other, it is like a social media except it respects your privacy and is open source and decentralized (meaning, there isn’t one person who controls everything) The Fediverse is an ethical alternative to Twitter, Facebook or any other social media.
- Forgejo: Forgejo is a platform used by software developers to upload their source code, file and respond to bug reports, feature suggestions and for developers to collaborate with each other. Forgejo is a fork of Gitea and is an ethical alternative to GitHub, SourceForge, Google Code and GitLab EE.
- Nextcloud: Nextcloud is a free alternative to Google Drive, OneDrive and other proprietary cloud storage providers. Nextcloud can be used as a backup tool or a synchronisation tool to synchronise files across devices, Nextcloud has native support for Linux, BSD, MacOS, Windows, Android, iOS and any Linux-Mobile system.
- PeerTube: PeerTube is a free and ethical alternative to proprietary video hosting sites such as YouTube, Vimeo or DailyMotion. Like Mastodon, PeerTube can federate with other services on the Fediverse because it has ActivityPub support.
- Jitsi: Jitsi is a meeting tool that respects your privacy, you can video chat with others and all of it is kept between the participants unlike Google, Zoom, Skype or Discord.
- XMPP/Jabber: XMPP is a lot similar to Matrix, it is an instant messaging platform but it is very advanced compared to Matrix and does not have encryption out of the box. But still, it is an ethical alternative to WhatsApp, Skype and Discord. (Did you know: WhatsApp used XMPP back in the day, so you could talk with WhatsApp users on your own server but now Facebook took that functionality away)
- The other 2 options are Onion and I2P services. explaining them is beyond this guide.
Remember: there are no wrong answers here either, you can choose what you want and if something sounds boring to you then you are allowed to turn it off. You can always request an account by contacting the admins.
Now that you are done, you can finally press
submit, and a request to the admins will be
sent. It will take around 48 hours for your
account to be processed but when it does, you
will be able to login to various ~vern services
using the password located in
~/pass.